
Hello fellow sports fans!
Today, I’m continuing my series of team spirit craft projects for the do-it-yourselfer.
You may remember that a few weeks ago I showed you how to create these easy Team Spirit Tassels using embroidery thread:

I love using embroidery thread, so this week I’m sharing another project that uses it, this time to create easy braided team spirit bracelets.
These kinds of bracelets are commonly called friendship bracelets, as they are popular among teenagers who like to make them and share them with their friends. Make them in your favorite team colors, however, and you have a trendy way to show off your school or team spirit!
So let’s get started:
Step 1 – The Supplies
You can find all of these things at your local craft store:
- 3 skeins of Embroidery thread
- choose your favorite team colors
- add white or black as a 3rd color if needed
- Scissors
- A ruler
- Tape or a safety pin – to anchor your bracelet while you work on it

Step 2 –Cut and knot the thread
- Cut 30” lengths of thread – 2 of each color, for 6 strands total
- NOTE: If you have large wrists, cut the threads to 36” so you have a little more to work with. You don’t want to run short!
- Gather the thread together, and tie a simple overhand knot near one end.
- Leave about 3” inches of loose thread at the end (you’ll need this to tie your bracelet on to your wrist when done).


Step 3 – Anchor the knot and lay out the threads
- Tape the knot to your work surface
- OR pin it to something that won’t move, like the arm of a chair or your pants leg.
- Spread your strings apart, keeping the 2 threads of each color together


Step 4 – Braid
- Start braiding by bring the right side threads (yellow in my case) over the middle threads (white).
- Then bring the left side threads (green) over the middle threads (yellow).
- Repeat this process to braid (right side to the middle, then left side to the middle).


- TIP: keep the braid even by holding all of the threads in your hands, and keeping a good grip on them as you braid (lightly pull on the braid, and the tape will hold it in place)
- Continue until you have almost enough braid to wrap around your wrist 3 times

Step 5 – Tie a knot and trim the ends
- Tie a knot at the end of the braid
- Remove the tape holding down the start of the braid
- Trim the loose threads so that they are about the same length on each end (3”)

Step 6 – Wrap and tie it on!
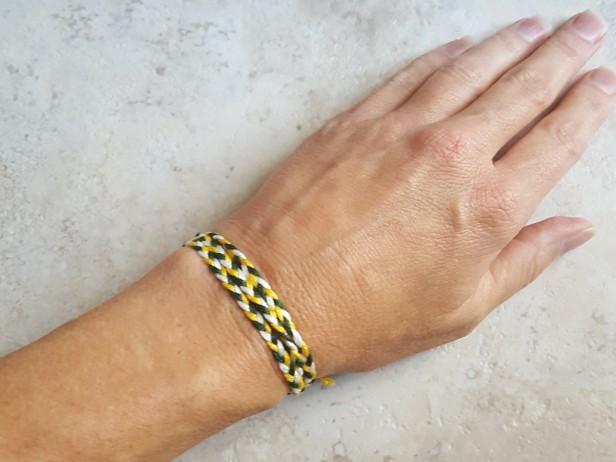
- Wrap the braid around your wrist 3 times
- Tie a knot to hold the bracelet in place, using the loose threads at each end


If you don’t want to wrap your bracelet 3 times, or use 3 different colors, here are a few other options:
Option 1 – Single Wrap
- Cut 15″ lengths of thread – 2 of each color
- Follow the directions above, but stop when you have enough braid to almost wrap around your wrist once
Option 2 – Single color
- Cut 6 strands of thread, using all of the same color
- Follow the directions above


I made my bracelets in Green, Gold and White. What colors will you use?
These bracelets are so easy and inexpensive to make, so I’m sure you’ll want to make a bunch of them once you get started. How about sharing them with the other sports moms you know, or the lovely ladies you tailgate with every weekend? They would also be fun as stocking stuffers or for the secret Santa exchange!
Who are you going to make some for? Comment below and let me know!
Until next week,
Carrie
P.S. Tying a knot while the bracelet is wrapped around your wrist is the hardest part of this process! I’ll show you some alternative ways to close the bracelet, as well as some fun patterned bracelets, in a future blog post! So be sure to follow me so you don’t miss it!

