
Hello sports fans! Did you catch the final four games over the last 2 days? Congrats to the South Carolina Lady Gamecocks and the North Carolina Tarheels! I love college basketball and really enjoyed March Madness, but now I’m ready to put it behind me and move on to April and Spring here in Georgia.
And it is definitely Spring, and almost starting to feel like Summer. We had some really warm weather here over the last week, with a few days above 80 degrees already! So my mind is definitely turning to shorts and tank tops, and warm weather clothing.
You know that I love scarves, and the t-shirt scarves we made a few weeks ago are perfect for wearing your favorite team colors any time of year. If you didn’t check this project out, you really need to, because I get compliments on my scarf everywhere I go. In fact I’m going to make a few more in bright colors, and wear them all summer long!

Today I’m sharing another super easy bracelet project, using old t-shirts. If you saved the top part of the t-shirts from the t-shirt scarves project, you are in luck. Because you only need 1 sleeve from each shirt to create these fun and stretchy bracelets! And you did save the top part of the shirts like I suggested, right?
So dig out those t-shirts (or find 2 old ones that are ready for the scrap pile), and let’s get started!
Step 1 – Gather supplies
You will need the following:
- 2 new or used t-shirts
- 100% cotton t-shirts work best
- Sharp scissors (preferably one made to cut fabric)

Step 2 – Lay out the first t-shirt
- Put the shirt on a flat surface, and smooth it out so it lays flat

Step 3 – Cut off the hem
- On one sleeve, cut straight across to remove the hem
- Repeat with the other color t-shirt

Step 4 – Cut 3 strips from each t-shirt
- Cut straight across the sleeve to create a 1” strip
- Repeat 2 more times, to get 3 strips
- Repeat with the other color t-shirt


Step 5 – Cut off the seam and cut to length
- Cut off the end of the strip where the seam is

- Open the strip, and cut it to about 12” long
- I have really small wrists, so I cut mine to 10”, but it’s better to be too long

- I have really small wrists, so I cut mine to 10”, but it’s better to be too long
- Repeat with remaining strips from both t-shirts

Step 6 – The fun part – Stretch it to create t-shirt “yarn”
- Take one strip of t-shirt at a time, and pull to stretch the material
- Stretch each strip 5 or 6 times

- You will see the edges of the t-shirt roll over on themselves
- You can see the difference between a stretched and un-stretched strip here:

- Repeat for the other 5 strips of material

Step 7 – Bracelet #1
- Gather up 2 strips of t-shirt yarn (1 of each color)

- Wrap the strips around your wrist

- Tie a knot

- Trim the ends


- And done!

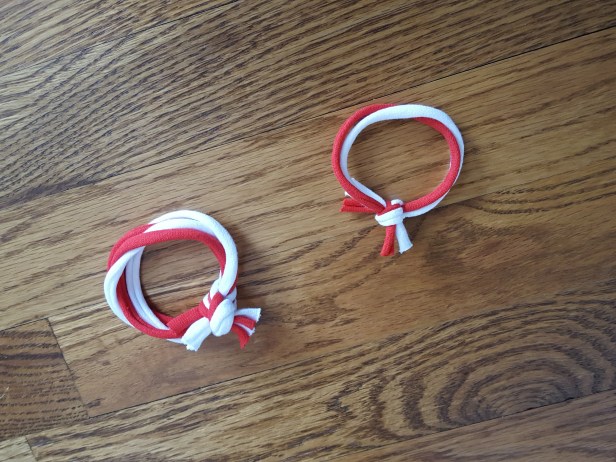
Step 8 – Bracelet #2
- Take the remaining 4 strips of yarn, and loosely braid or weave them together a few times

- Wrap the strips around your wrist
- Tie a knot
- Trim the ends


And bracelet #2 is done:

That fast and easy, wasn’t it?
If you like these bracelets, and would like ideas on how to make more of them, stay tuned for future blog posts!
Until next week, I’m off to enjoy the great outdoors before the really hot weather arrives!
Carrie
P.S. If you prefer to buy your team spirit wear instead of making it yourself, and you haven’t visited the Team Colors by Carrie shop lately, you really should. I just launched a new jewelry collection called Rubber Meets the Road, featuring earrings and bracelets that are part industrial modern and part boho chic. Here are a few samples:
")
")


